Snapchat is a popular social media app that allows users to share photos and videos with friends. While Snapchat is banned in China, this limitation hasn’t prevented the platform from becoming one of the most significant ones on the internet. Hence, today, it boasts three hundred million daily users.
However, the size of a social media network has nothing to do with its usefulness. Sometimes, you need to get away from some things. If you are having a hard time deleting your Snapchat account, you must continue reading to learn how to do it.
Deactivate/Delete Snapchat account – Quick guide
We will explain in detail every step you need to take if you want to download all your Snapchat data and permanently disable your account. However, the essential process is pretty simple, and if you’re in a bit of a rush, here’s what you need to do:
- Log in to your Snapchat account.
- Click on the “Download my data” option to download all your personal data before you disable your Snapchat account.
- Follow the “Account deactivation” link to start with the process.
- You will need to provide your credentials again. If your account has 2FA, then follow through with the second-factor verification.
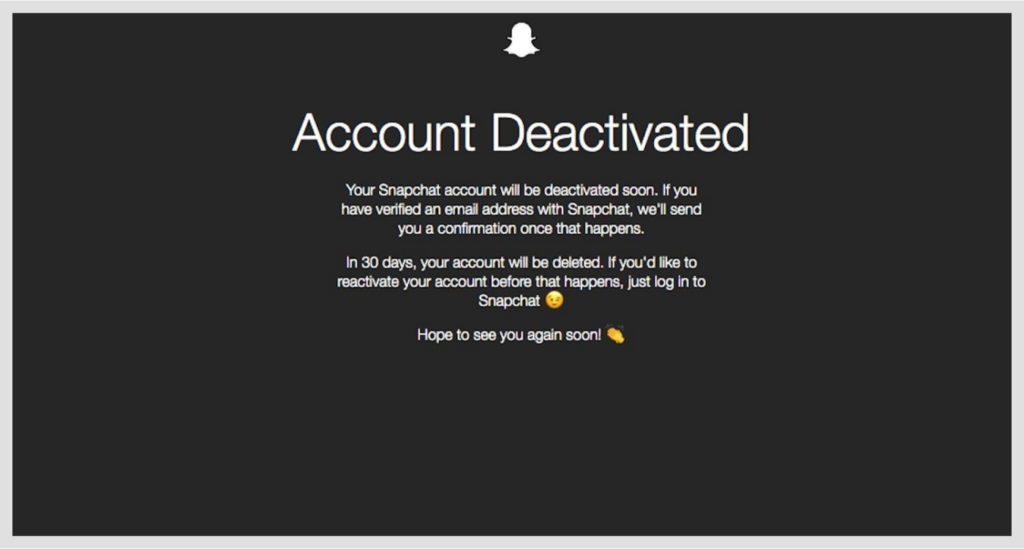
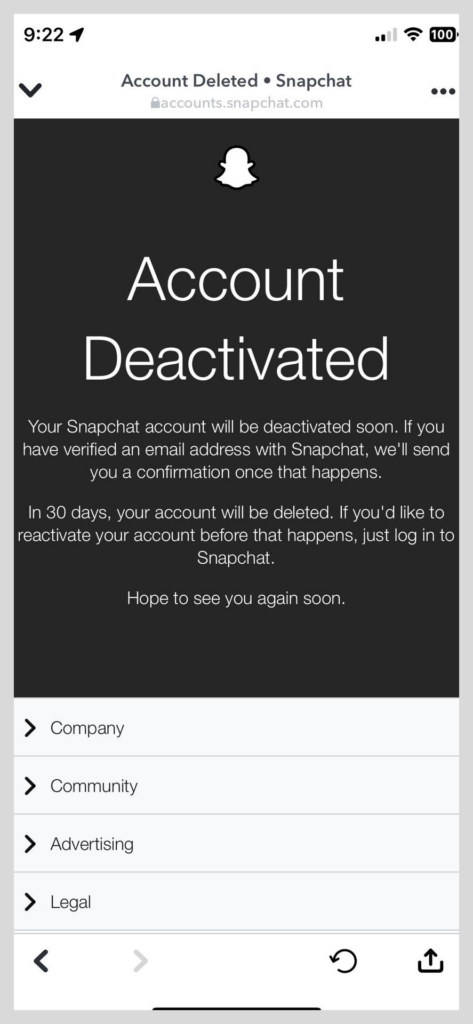
You are home now. Your Snapchat account is deactivated. Now you can’t use it, and others can’t send you messages.
Download your Snapchat data

If you’d like to keep any of the data you have stored on Snapchat, you must do it before disabling your account. Once your account is disabled, you can’t do anything with it anymore unless you request a reactivation before 30 days. So, having access to the information you intend to download requires an active account.
- Log into your account.
- Next, click on “My Data.”
- Scroll down to the bottom of the page. You’ll find the “Submit request” button. Click on it.
- You now need to provide your verified email address with your Snapchat account (the one you provided when you signed up for a new account).
After a few seconds, the email address in question should get a message from Snapchat. Inside it, you will find a link enabling you to download a file containing all of your Snapchat information. That information may include your user name, snap history, chat history, memories, friends, search history, and emojis.
What kind of information does Snapchat store about me?
Snapchat keeps three types of information, as outlined below:
- The information acquired when using Snapchat. It includes information about your device, logs, location, etc.
- The information acquired from third parties. Particularly other users’ contact lists and information from third-party apps and advertisers.
- The information you decide to provide. It includes all the data you submit to the app while using it.
If the law requires, Snapchat may share this information with business partners, other users, concerned parties, or sister corporations. It may also share your data with data brokers or use it for personal gain via ad-targeting. Fortunately, you can use services like Incogni to get out of data brokers automatically. Besides, Snapchat is not private; it is also not secure.
For example, it does not use end-to-end encryption like other social media applications. Alternatively, you can opt to use more secure messaging platforms that respect your privacy, like Telegram and Signal.
Deactivate your Snapchat account
After downloading your data, you can proceed toward Snapchat deactivation. However, remember that these steps are just the initiation of your departure from the platform. To complete Snapchat account removal, you must perform some additional steps (explained in the following section).
But before deactivating, double-check your downloaded Snapchat data to ensure you don’t regret deleting your account.
You cannot delete your Snapchat account from the Android app, but you may do so through your browser by following the steps below:
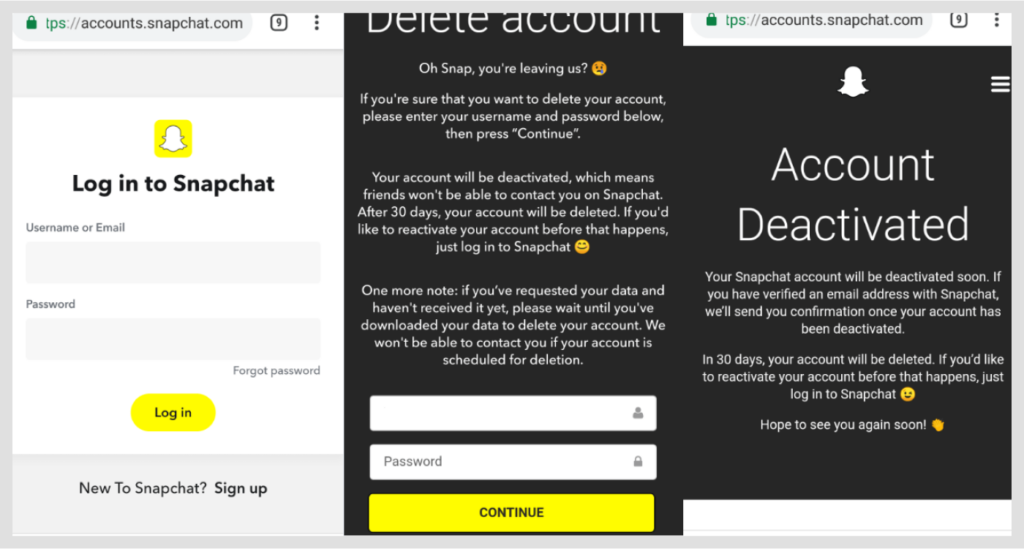
- Navigate to the Snapchat Account Portal page using your browser.
- Sign in to your Snapchat account.
- Click on ‘Delete My Account.’
- Re-enter your username and password.
- Select ‘Continue’ at the bottom to finish the process.
How to delete your account on iOS
iOS users can delete their Snapchat account using the Snapchat app by following the steps outlined below:
- Open your Snapchat app.
- Click on your profile icon in the top-left corner.
- Tap on the settings icon.
- Scroll down to Account Actions.
- Select the ‘Delete Account’ option.
- You will be redirected to the Accounts Portal site.
- Follow the instructions from ‘Deactivate your Snapchat account’ to complete the process.
If you choose to reactivate your account, snapchat will store your information for 30 days. Remember that your account will be permanently deleted if you fail to return within this duration.
How to delete your Snapchat account
So now that your account is deactivated, the next pertinent question is: how do you delete it completely? That is the easiest part: Nothing.
Once you deactivate your Snapchat account, you only need to count to 30 because the service will delete the account once 30 days have passed. It is all automatic, so you just sit back and wait. In the meantime, your account is already as good as deleted because it allows no activity whatsoever.
If you want your account deleted right now, we’re sorry to tell you that Snapchat doesn’t support that action. Instead, every disabled account must wait 30 days before it goes away.
You’ll know that deletion occurred because, after that point, you would have no more access to your list of friends, account settings, snaps, chats, stories, or any other item — unless you downloaded all your Snapchat data before disabling it.
Will my Snapchat info really be gone forever?
Snapchat retains some of your data even after your account is permanently deleted for legal purposes. This data includes the accepted terms of service and any in-app purchases you may have made. Every other information, like your location, stories, Snapchat friends, account settings, and chats, will be permanently erased.
Moreover, you can email support@snapchat.com requesting any other data they may still have on you to ensure your information is permanently deleted.
Why you should delete Snapchat
Whether Snapchat removes your videos and photos without your permission is still uncertain. Furthermore, Snapchat acknowledged that any content that disappears is retained in their backup servers for a given duration.
Other users may buy your snap replays from the app and screen-record or screenshot your snaps without your knowledge.
Snapchat and data collection
Snapchat stores a variety of your data, including device information, location, contact lists, and more. This data may be shared with interested third parties, threatening your privacy and security.
Addiction, mental health concerns, and other criticisms
The following are some of the effects of using Snapchat on the users’ general and mental health:
- Addiction. Because of its addictive design, this platform constantly entices users to spend most of their time on their phones.
- General health concerns. Extensive use of social media platforms may cause headaches, insomnia, and eye strain.
- The augmented reality features of Snapchat have been proven to cause distorted or negative self-images among the younger generation.
- Mental health. Overusing the app and other social media platforms may also lead to loneliness, stress, and anxiety.
Snapchat is neither the safest nor the healthiest platform, so should you consider deactivating or deleting your account to improve your online privacy and mental health?
Deleting vs. deactivating Snapchat
The deletion process in Snapchat starts with a 30-day long deactivation period. So don’t rush about forgetting your username or password since 30 days is long enough to change your mind.
You can reactivate your Snapchat account in the following 30 days by logging in again with your username (email login doesn’t work with deactivated accounts). But be patient. After you reactivate your account, you’ll have to wait a whole day.
Then, if you do nothing for 30 days, your Snapchat account will definitely be deleted.
How to restore your Snapchat account
You can only restore your Snapchat account within 30 days of deactivating it. Follow the steps outlined below to do it:
- Open your Snapchat app and log in using your previous username and password. Using your email to sign in after deleting your account will no longer work.
- You will be asked if you want to reactivate your Snapchat account. Click Yes.
- Snapchat will then notify you to wait to restore your account? Tap OK and wait.
- Your account will be restored, and you can now log in!
Can I use Snapchat without losing my privacy?

Whenever we consider the Big Brotherish nature present in many apps we know and love, we feel tempted to delete every account, cancel our phone and internet service, and throw away every device. But, of course, that would be radical, absurd, and impossible. Nevertheless, there’s plenty we can do to ensure that we can remain as private as possible within each particular environment, Snapchat in this case.
So don’t reach out for your hammer just yet. Before you destroy your phone because of Snapchat, try these suggestions first, they will help you to keep enjoying Snapchat without giving away too much of your privacy.
1. Update your Snapchat privacy settings
Have you ever had a look at Snapchat’s privacy settings? If not, please do it now. You will find different settings that give you back some degree of control over your social media information. Consider each option and make a choice.
Then, make sure to turn on Ghost Mode. It will limit the location data your app knows about you, short of disabling location tracking too.
2. Use a VPN
VPNs are the easiest and most effective way to protect your online privacy, security, and anonymity. A good VPN will encrypt your traffic and spoof your IP address. Moreover, if your VPN keeps no user logs, your internet activities will never be traced to your IP address.
Additionally, the best VPNs will give you plenty of advantages, such as avoiding the geographical restrictions you find in almost every video streaming service.
The VPN we like best for almost every task is ExpressVPN. It’s also suitable to help you protect your privacy as a Snapchat user. It’s fast, reliable, has servers everywhere, and is easy to use. Undoubtedly, ExpressVPN has the most prominent reputation in the VPN-verse for excellent reasons.
FAQs
Yes. If you reactivate your account before 30 days have passed, you will keep all your content and settings intact. But you must wait a full day before your account goes online again.
No. Your friends will notice that your Snapchat account has disappeared, and that’s it. There is no alert or notification.
It could. The company reserves the right to keep some of your data once you leave the service. Your purchase record is one example. It’s in the Snapchat Terms of Service, which you agreed to before you could use the app.
You can’t. While the Snapchat support team can help you reset your password in an active account, their hands are tied if it’s deactivated.
Run a search for the username you’re interested in on Snapchat. If no result shows up, it’s almost definitive that the account is deactivated.
The people who received your messages will still be able to access them.